Free Crochet Pattern
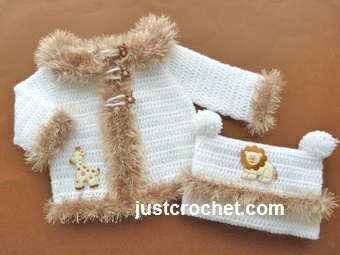
Fluffy Coat and Hat
USA Format
Abbreviations
WS. Wrong Side
RS. Right Side
ch. Chain
sc. Single Crochet
dc. Double Crochet
rpt. Repeat
sl st. Slip Stitch
Inc. Increase
Base of ch.Work in first stitch
ch3 counts as first dc
(not on sleeves and hat)
Size to fit approx: 18 Inch Chest 3-6 Month Baby
Coat: Finished length from shoulder 10.5 Inches
Sleeve length from under arm 5 Inches
Hat: Approx length from top to bottom 7.5 Inches
Materials
140 grams of King Cole big value baby DK in Color 1
50 grams of King Cole Tinsel in Color 2
OR
5oz of Light Worsted Weight #3 in color 1
1.75oz of Light Worsted Weight #3 in color 2
4.00mm crochet hook
3 novelty buttons
GAUGE - 5dc and 2.5 rows of dc's measures approx 1 Inch
***************************************************
Coat is worked in one piece starting from yoke
With 4.00mm hook and color 1 ch57, (RS) 1dc in 4th ch from hook, 1dc in the next
6ch, (front) 3dc in next ch, 1dc in next 8ch, (shoulder) 3dc in next ch, 1dc in the
next 19ch, (back) 3dc in next ch, 1dc in the next 8ch, (shoulder) 3dc in next ch,
1dc in the next 8ch. (front) Turn. (62dc + ch3)
Rows 2 to 10 - (Inc Rows) ch3, * 1dc in each dc to 3dc group, 1dc in next dc, 3dc
in centre dc on 3dc group, * rpt from * to * to last 3dc group, 1dc in next dc, 3dc
in centre dc on 3dc group, 1dc in each dc to end, 1dc in top of ch3.
You should have 134dc + ch3 at the end of Row 10.
Row 11 - (Divide for Armholes) ch3, 1dc in each dc to centre dc of 3dc group, 2dc
in centre dc, skip 28dc, 2dc in next dc, 1dc in each dc to centre dc of next 3dc
group, 2dc in centre dc, skip 28dc, 2dc in next dc, 1dc in each dc to end, 1dc in
top of ch3. Turn. (82dc + ch3)
Row 12 - ch3, 1dc in each dc to end. Turn.
Rpt Row 12 until 22 rows have been worked from beginning or work measures approx
10 inches from shoulder. Turn.
Button Loop Row - ch1, 1sc in base of ch1, 1sc in each dc to ch3 to turn with, 3sc
in top of ch3, working up first front edge work 1sc in the space of ch3 to turn with,
2sc in each of next 13 row ends * ch24, 2sc in each of next 4 row ends, * rpt from
* to * once, ch24, 2sc in corner, 1sc in each ch around neck to next corner, 2sc
in corner, 2sc in each row end down second front edge to end, sl st to first sc on
beginning of row. Fasten off. (3 button loops made).
Sleeves x 2 - With RS side facing join color 1 to side of dc under arm with a sl
st, ch3, 1dc in same space, 1dc in each of next 28dc, 1dc in side of dc on opposite
side of sleeve, skip ch3 on beginning of row, sl st to first dc. Turn. (30dc)
Next Row - ch3, 1dc in base of ch3, 1dc in each dc to end, skip ch3, sl st to first
dc on beginning of row. Turn.
Rpt last row until 20 rows have been worked from beginning or under arm sleeve seam
measures approx 4.5 inches. Turn.
Next Row - ch1, 1sc in base of ch1, 1sc in each dc to end, sl st to first sc on beginning
of row. Fasten off. Turn. (30sc)
Cuff Edge - With WS facing join color 2, ch1, 1sc in base of ch1, 1sc in each sc
to end, sl st to first sc on beginning of row.
Starting with ch1, 1sc in base of ch1, work 1sc in each sc to end, sl st to first
sc. Turn.
Rpt last row once. Fasten off.
Collar - With WS facing join in color 2 to neck edge, ch3, 1dc in the next 7sc, 3dc
in next sc, 1dc in next 8sc, 3dc in next sc, 1dc in the next 19sc, 3dc in next sc,
1dc in the next 8sc, 3dc in next sc, 1dc in the next 8sc. Turn. (62dc + ch3)
Second Row - ch3, * 1dc in each dc to centre dc on 3dc group, 3dc in centre dc, *
rpt from * to * to last 3dc group, 3dc in centre dc on 3dc group, 1dc in each dc
to end, 1dc in top of ch3. Turn.
Rpt Second Row once. Fasten off.
Front and Bottom Edge - With WS facing join color 2 to neck edge on button hole loop
side, ch1, 1sc in base of ch1, 1sc in each sc down first front edge to corner, 3sc
in corner, 1sc in each sc along bottom of coat to next corner, 3sc in corner, 1sc
in each sc up second front edge to neck. Turn.
Starting with ch1, 1sc in base of ch1, work 1sc in each sc around coat to end, working
3sc in each corner.
Rpt last row once. Fasten off.
Finishing - Close small gaps under arms, weave in any loose ends of yarn and trim,
sew on novelty buttons to correspond with button loops.
Hat - With color 1 ch72 loosely, sl st to first ch to form a ring, ch3, (RS) 1dc
in base of ch3, 1dc in each ch to end, skip ch3, sl st to first dc on beginning of
round. Turn. (72dc)
Next Round - ch3, 1dc in base of ch3, 1dc in each dc to end, skip ch3, sl st to first
dc on beginning of round. Turn.
Rpt last round until 18 rounds have been worked or work measures approx 7.5 Inches
from beginning. Turn.
Next Round - ch1, 1sc in base of ch1, 1sc in each dc to end, sl st to first sc on
beginning of row. Fasten off. Turn. (72sc)
Join in color 2, ch1, 1sc in base of ch1, 1sc in each sc to end, sl st to first sc
on beginning of round. Turn.
Starting with ch1, 1sc in base of ch1, work 1sc in each sc to end, sl st to first
sc on beginning of row. Turn.
Rpt last row once. Fasten off.
Finishing - With WS facing centre slip stitch seam to back of hat, sl st loosely
the cast on edge together (top of hat) to close the open gap.
Weave in any loose ends of yarn and turn through to right side, fold approx 2 Inches
onto front of hat to make a brim, Make 2 small sized pom-poms in color 1,
I used the Clover Pom-Pom maker size 45 attach one Pom-Pom to each corner and secure
tightly.
Hope you enjoy this free crochet pattern for a fluffy coat & hat.
All Rights Reserved copyright © 2016 justcrochet.com
FJC86
If you are having trouble printing, please try another browser
(Some browsers will print blank pages)
Please do not re-post any of the pictures from this site
on other websites or use any as your own.
If you do make and sell the finished items
from any of my patterns
please give credit to justcrochet as the designer and
put a
link back to this website.
Thanking you Heather
All patterns and pattern pictures on this website
are © copyrighted to justcrochet